Our company is the largest automobile shaft head manufacturer in China. The shaft head is mainly used for the rear axle welding of the heavy truck, the casting axle shell and the engineering drive axle. The shaft end of the cast steel bridge adopts the hot assembly press-in method, which belongs to the hollow long-axis forgings, and the blank is as shown in Fig. 1. This type of shaft head is used for 13t cast steel axle housing developed by a well-known automobile company in China. It is mainly used for tractors and engineering vehicles. The working environment is complex, it must bear the load and impact load, and it must withstand the alternating road conditions. Stress, the shaft head directly affects the driving safety of the vehicle. The axial length and the inner hole ratio are 622 mm/59 mm ≥ 3, and the blank is deep hole processing. The φ59m m hole becomes a difficult point for rough machining.

1. Comparison of the process of punching the shaft head
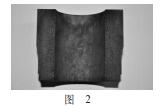
(1) Option 1 is made of custom seamless steel pipe (YB/T5035-2010 semi-axial casing seamless steel pipe). This scheme is the original process of the shaft head, and the pipe with the close size is customized. The machining method meets the requirements of the process size, and has the advantages of simple process, low cost and uniform wall thickness, but the inner wall is loosely organized (see Figure 2). Causes unstable mechanical properties.

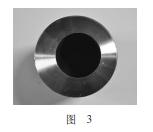
(2) Option 2 Round steel cutting → heating (1150~1180 °C) → blanking → hot extrusion of the inner hole. This solution uses a 20M N press. The shaft head processed by the process has the advantages of compact internal structure, high mechanical strength and small machining allowance, but wall deviation control is the key to the success of the process (see Figure 3).

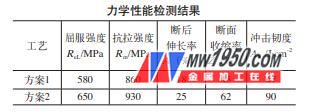
Comparing the above schemes, according to the mechanical property test results, as shown in the attached table (using the same heat treatment process), Scheme 2 is significantly better than Scheme 1, but the wall deviation problem in Scheme 2 should be strengthened by the process means.

2. Mold structure analysis
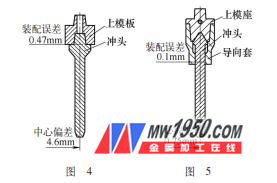
For the technical requirements of the hot extrusion of the inner hole of the shaft head, the following is the analysis of the mold structure: Our company originally used the mold structure shown in Figure 4, because it is a deep hole hot extrusion (length ≥ 600m m), the mold bears For dynamic loads above 5~20M N, the punch is easy to loosen and the thread is matched with the gap. Even if the accuracy of the press is not taken into account, it will be misaligned with the center of the lower mold. It is calculated that the limit deviation value is about 5mm to ensure the quality of the forging. The blank wall deviation must be checked every 10 pieces to tighten the punch in time. It is indicated in Figure 4 that the die is fixed in the lower die base. According to the following die as the reference, the principle of the upper die is corrected. The punch should ensure accurate and stable guiding, because the upper die seat and the hydraulic beam movable beam have positioning and matching devices. Therefore, the scope of adjustment and improvement is limited to the structure of the punch. Combined with mold installation and cost considerations, the technical analysis determines the dual positioning guide structure (see Figure 5) with sliding guide and tapered surface positioning to avoid design disadvantages from the structure.

Fig. 5 shows the double guiding structure of the punch. The punch and the guiding sleeve are arranged with sliding spacing. The upper end surface of the punch and the tapered surface of the upper mold base are always in a sliding fit state. The punch material is H13 and the hardness is 48~52H RC. A 60° cone angle is used. When the punch is down, the guide sleeve and the tapered surface of the punch give the punch guide to ensure that it is centered with the lower die. Even if subjected to load impact, the punch will not be skewed, and the lower end of the punch (guide sleeve and punch) It has a size of 60m long and the ultimate fit size is ≤0.10mm.) After the end face of the guide sleeve is pressed against the workpiece, the upper end surface of the workpiece can be flattened, which reduces the difficulty of processing the subsequent machine.
3. Conclusion
The deep hole hot extrusion process can ensure the internal structure of the deep hole is dense, and the mechanical performance index is greatly improved. After the optimized design of the mold structure, the workpiece wall deviation is ≤ 3 mm, the material utilization rate is improved, and the labor intensity of the mold adjustment is reduced.
Custom Indoor Electrical Junction Box,Motorcycle Parts Custom,Stamping Welding Silicon Stator Lamination,Custom Rotor Plate
JIANGSU TONGDE INTERNATIONAL TRADE CO.LTD. , https://www.tongdetrades.com